
|
|||||
|
|
|
|||
| HOME |
STORIES |
INTERVIEWS | REVIEWS | ON TOUR | TIMELINE | LIBRARY |
BIKES | COLLECTION | LINKS |
 |
Ever wanted to build the same bike Greg LeMond used in his career but you don’t know where to start or what components to use ? You’re in the right place. Greg LeMond Fans will help you through this process. Remember our bio … From Fans For Fans. This bike was made by a French company named TVT and was re-branded with the famous LeMond bike company logos. Rebuilding a bike is not that easy. First you have to know which components were used and then you have to find them somewhere on the net like eBay. Luck and a nice budget are the 2 major things you need. And off course a lot of patience. For
this article we needed some help. Neither of us 3 (Albert, Nicolas or
Thierry) has this bike at home. We all want one, but realizing the
dream of owning one is another thing. We were lucky to find somebody
who has the same interest as us, who is also a real Greg LeMond fanatic
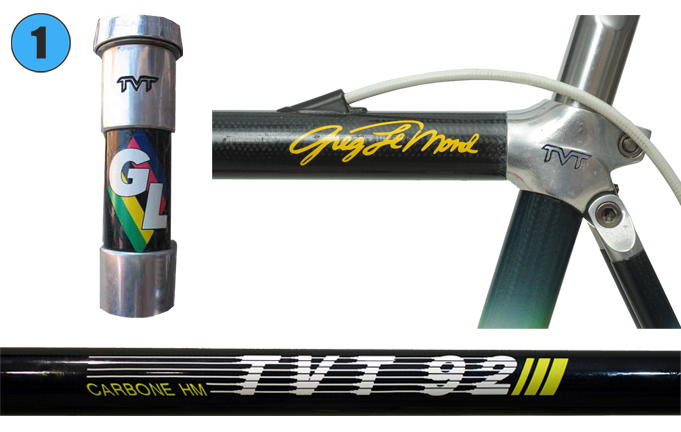
and has rebuilt 2 of Greg’s Tour de Franc The main question is … Where does one start if you want to build a replica bike ? To start you’ll need a list of all the components you need. Not so easy but we’re here to help you out. First there is the main part of the bike, the frame. TVT made 2 editions of that frame, the HM and HR model. Greg’s frame (and the rest of the Z team) was a TVT Carbone HM model. The difference between an HR (high resistance) and an HM (high module) frame is that the HM is slightly lighter and stiffer. Only problem is … finding the HM frame is almost impossible. The HR frame is also difficult but easier to find. The way to tell them apart, is that the HM version has “TVT” engraved on the head tube and seat tube and it has the “TVT 92” decal with “Carbone HM” on the top tube (image 1).Eric’s version is a TVT Carbone HR imported by Ten Speed Drive Imports and he added a set of “TVT 92 Carbone HM’ decals to it. The frame models imported from France to the US (HR Version like Eric’s) were called the Alpe D’Huez. Greg’s bike did not have a name like that though. So having the HR frame your bike will look like this. Nice, but you can’t ride it yet. It needs some other parts. The next part you need are the Scott Drop In bars. Finding this is easy but you need to have the right size. The one from Eric is 26.0 mm and is “Grey Anodized” (left on image 2) which has a built in clamp area instead of shims. If you use the Scott bars (right on image 2) which have no clamp area at all, you have to put two short metal pieces around the bar before clamping it to the stem. The bars are attached to the stem. We need a Scott branded 3TTT Record 84 Quill stem. Greg used an 11.5 mm stem on the 26.0 mm clamp area. 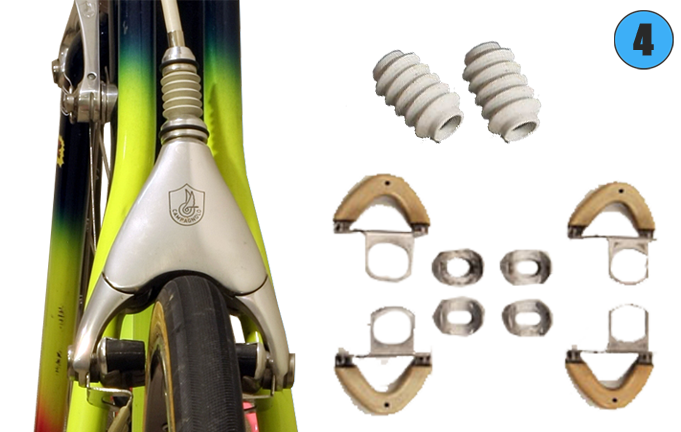 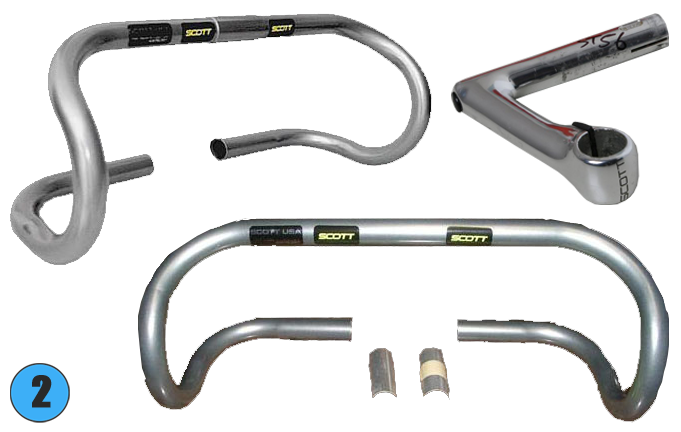 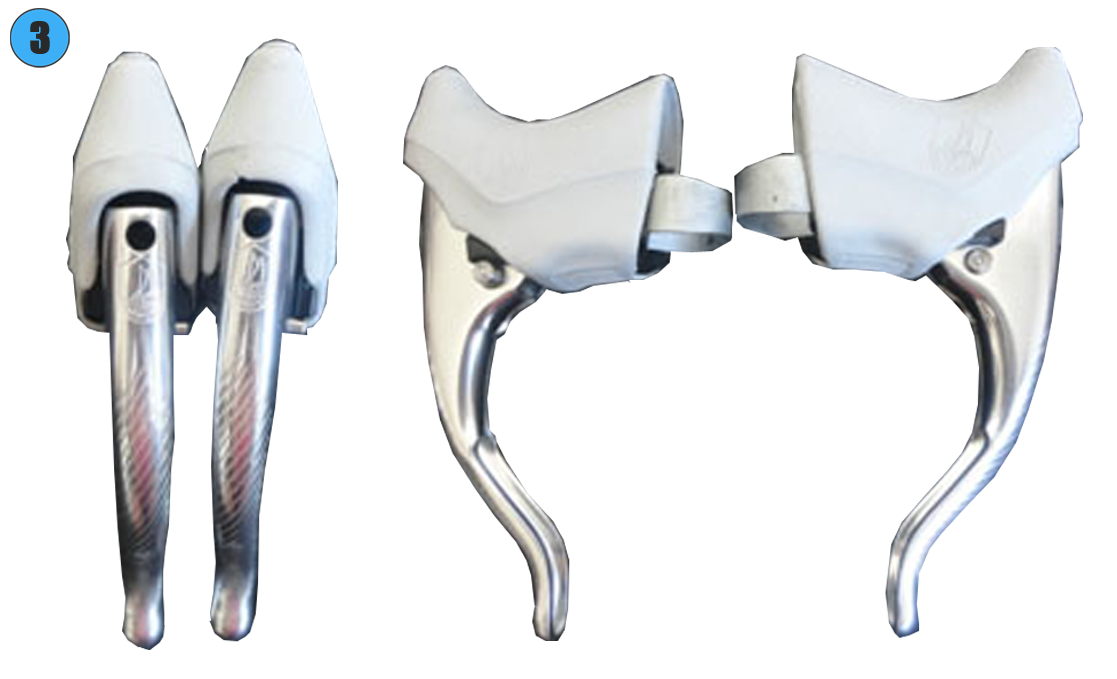 Now you can nicely attach the bars to the frame using the Campagnolo C-Record headset. The one Greg used was from the the Campagnolo catalog of 1988 (Model A0D0). The following parts that need to be installed are the brake levers. These levers are Campagnolo Record brake levers and have an adjustable reach that could be adjusted while on the bike (image 3). Those brake levers are handling the brakes. We still need the ones from the 1988 catalog. The Campagnolo C-Record Delta brakes are a beauty. The look is really great. With the beige bellows and guidewheels your brakes are ready to be used. Finish them off with a set of original Campagnolo brake housing. Next part is the bottom bracket. Again we need the Campagnolo C-Record bracket from the 1988 catalog (model A0H0). Eric used the modern Campagnolo Veloce 68×111 cartridge style bottom bracket for 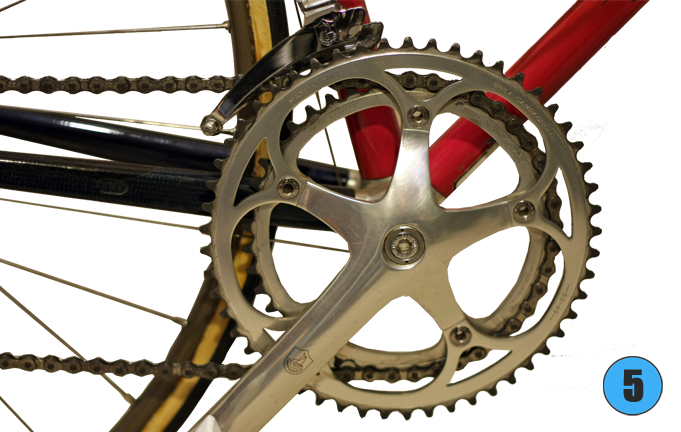 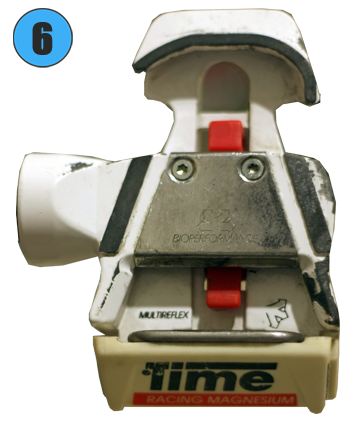 easy maintenance
(image5). When
the bottom bracket is installed we can start with the cranks. Try to
find the Campagnolo C-Record Crankset from the 1988
Catalog (front
chainwheel of 53T/42T) (Model A040). Greg
preferred a 175mm Crank length. Eric’s bike has a 170mm. Greg’s bike,
displayed in the US Cycling Hall of Fame (Davis, California), has a
53T/41T front chainwheel combination.
With the cranks installed
it’s time to put the front derailleur on the bike. You need to find the
Campagnolo C-Record Front Derailleur Clamp-On version (Model A022) from
the 1988 Catalog. easy maintenance
(image5). When
the bottom bracket is installed we can start with the cranks. Try to
find the Campagnolo C-Record Crankset from the 1988
Catalog (front
chainwheel of 53T/42T) (Model A040). Greg
preferred a 175mm Crank length. Eric’s bike has a 170mm. Greg’s bike,
displayed in the US Cycling Hall of Fame (Davis, California), has a
53T/41T front chainwheel combination.
With the cranks installed
it’s time to put the front derailleur on the bike. You need to find the
Campagnolo C-Record Front Derailleur Clamp-On version (Model A022) from
the 1988 Catalog.Next you need the pedals. The Time Racing Magnesium Pedals are the ones Greg used in 1990 (image 6). Time pedals need Time shoes, right ? Well, LeMond started the season with Time shoes but finaly got Brancale’s that fitted his feet. Those could be a nice add-on to the bike. Halfway done. Your bike still needs some important parts to have it finished, but we’ve proceeded pretty far until now. Let’s take a look at the saddle. Before we can mount a saddle we need a seatpost. The Campagnolo C-Record “Styled” Seatpost 180mm from 1988 catalog (Model A0R1) is the exact model for this bike (image 7). Now the saddle can be attached on the seatpost. Greg used a San Marco Regal Girardi saddle, made by the famous Italian manufacturer. Time for the back derailleur and levers. Do we need to say you’ll need the Campagnolo C-Record models again? Let’s start with the rear derailleur. You don’t need the 1988 one now but the Campagnolo C-Record Rear Derailleur from the 1990 catalog (image 8). We can’t mount the 7 speed freewheel yet. We have to wait for the wheels. What we can do is install the gear levers on the frame (image 9). Again we need the Campagnolo C-Record model. These are the Syncro Braze-on Levers from the 1988 catalog (Model A221). Attaching the cables to both derailleurs and installing an original Campagnolo rear derailleur housing will complete the gear installation 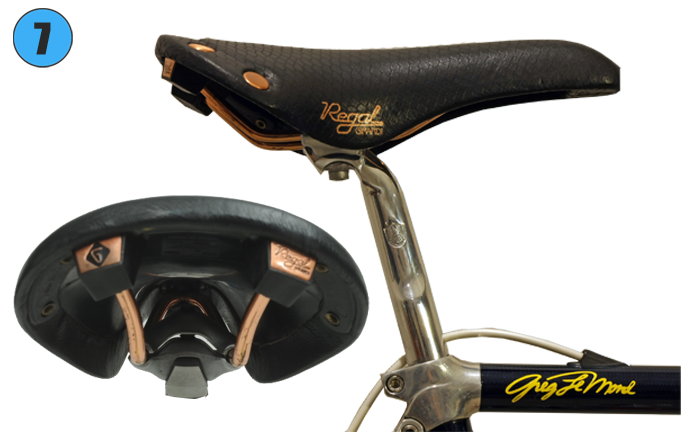 . .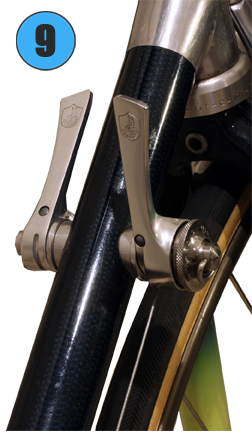 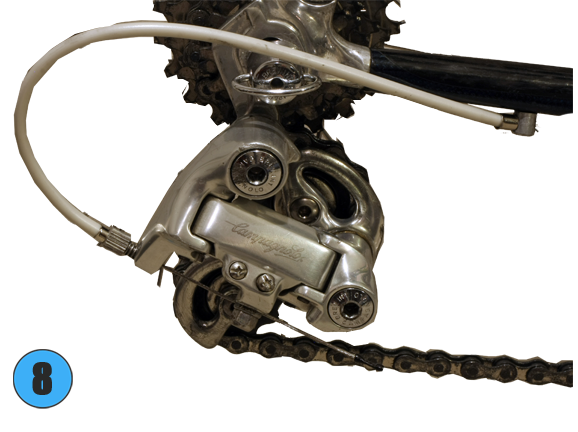 Our bike is almost done now. All we need are the wheels and some nice details. Probably you’ve already spent a lot of money. Hang on. You’re almost there. Let’s look for the right wheels now. First you need the hubs and skewers. Look for the Campagnolo C-Record Front and Rear 32H Hubs and skewers from the 1988 Catalog. Then you can mount the spokes on the hubs. We don’t have any info about the spokes LeMond used. They were probably DT Swiss like he used on the 1991 Calfee bikes. But you can choose the ones you like. All we have to do now is connect the spokes with the right rims. The rims are the Campagnolo Sigma Strada Hardox 32H Tubular rims. They have those nice blue white stripes printed on it.  When the wheel is all set up you can mount the freewheel on it. LeMond used a Maillard 700 Compact 7 Speed Freewheel. Eric's is a Sachs-Maillard 700 Compact 7 Speed Freewheel (image 12). The only difference is in the shape of the teeth. This bike has a 12-21T freewheel with a 41T in the front and a 21T in the back you’re not ready to climb the steep mountains. It’s of course your own choice which 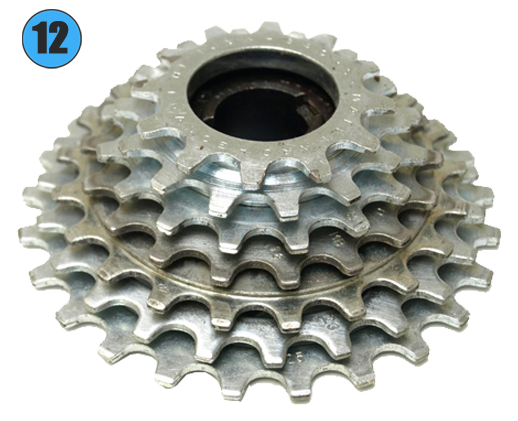  configuration
to use on your bike. The
chain is the last mechanical part to put on your bike. Our three times
Tour de France winner used the Rohloff S-L-T 99 chain (image 13 -
down). Now comes the moment where your hands can get dirty. You need to
install the tires. Greg used tubular tires which means you have to
paste them with some you tubular glue. You have to find the Vittoria
Corsa CX 21mm Tubular tires used in 1990 (image 13 - up). configuration
to use on your bike. The
chain is the last mechanical part to put on your bike. Our three times
Tour de France winner used the Rohloff S-L-T 99 chain (image 13 -
down). Now comes the moment where your hands can get dirty. You need to
install the tires. Greg used tubular tires which means you have to
paste them with some you tubular glue. You have to find the Vittoria
Corsa CX 21mm Tubular tires used in 1990 (image 13 - up).Wow, you can now actually sit on your bike, and take a ride. It only needs some details to get it finished. First there is the grip tape. Before putting the tape on the bars you need to do some preparation. A pair of metal shims that used to be included with “Scott Grip Wrap” called “Scott Thangs” are installed in the drops, just as on Greg’s. If you can’t find “Scott Thangs” you can take a seatpost shim and cut it in thirds and to 70mm in length. Greg had some sort of plastic or foam inserts adapted to the Drop In portions of the bars during the 1990 TDF (image 14). This can be replicated by taking pieces of tubular foam purchased at a craft store and cutting them to fit. Now you can start with grip tape. This tape is the vintage pearl (or satin) white from Benotto (image 15). Finish with white electrical tape to get it fixed it to the bars. You will need two sets because of the length of the drop in’s. The Scott decals used to come with the Drop in Bars. If you don’t have any of these Scott decals we can help with it. Eric scanned a copy of the original decals and had new ones made on adhesive vinyl at an online print shop. You can download those decals here. Print them on adhesive laminate with the following size: 10x10 cm or 4x4 inches. Just as Greg’s mechanic did, Eric wrapped the Scott decals around the Benotto tape on the drop in portion of the bar. 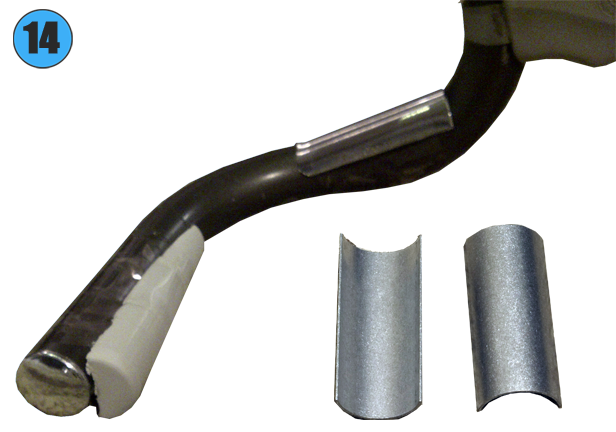 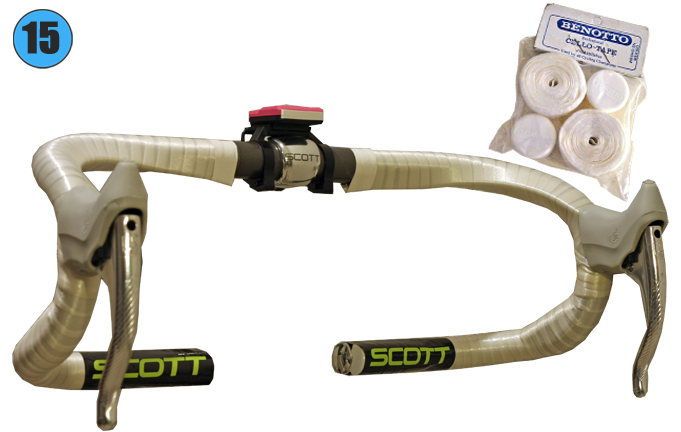 Finding the right computer is one of the hardest things to do. It’s not easy to find the right model used by Greg in the 1990 Tour de France. Start searching for the Ciclomaster CM 34 cyclometer. Not a white or a black one, but a pink edition (image 16 left). For some reason Greg pasted a white piece of electrical tape on the front it. Was it broken, was it hiding a name that was not liked by Greg’s sponsors? We believe it was broken and used to keep the upper and lower part together. Eric purchased a black CM 37 model and painted it pink. Finaly all you need are two bottle cages. Pink was apparently loved by Greg in those days. Greg used 2 pink ones on his bike. You can start searching for pink bottle cages on eBay but it’s easier to buy 2 similar models and have them spray painted in pink to match the originals. The ones used by LeMond were the T.A. bottle cages (image 16 right). 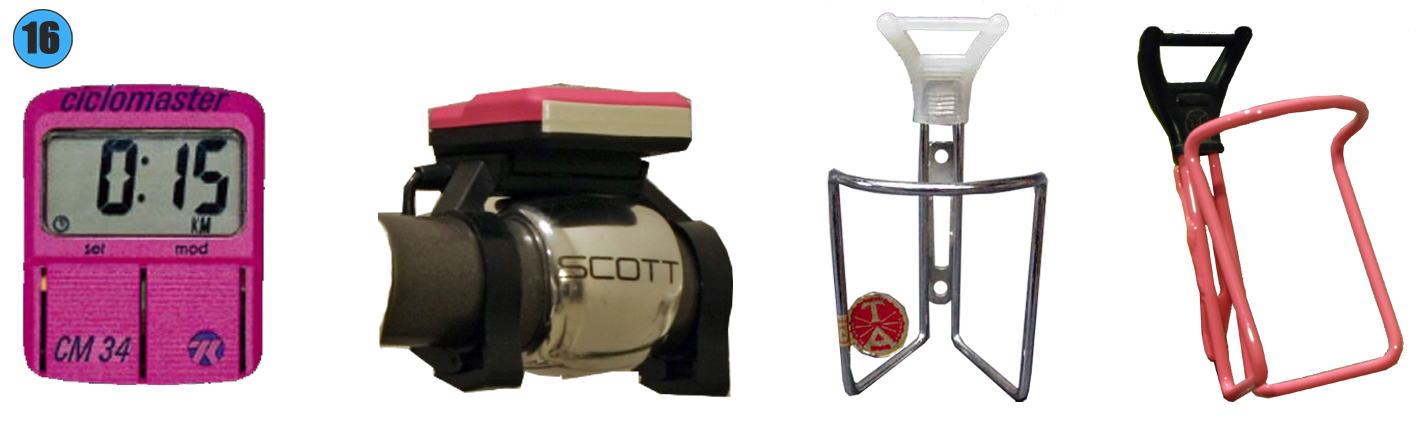 Next you will need some decals. Eric worked with Greg Softley at Cyclomondo to make a reproduction of the TVT 92 decals for the top tube. The four “Z” decals and yellow “Greg LeMond” signature, are all originals purchased on eBay. The downtube and headtube decals are new reproductions purchased on eBay as well. The fork and rear chainstay “LeMond” decals are the originals. The original decal set is not for the “Alpe D’Huez” model, (colors on the downtube and headtube are different), but the “Z” logos, yellow signature and rear chainstay logos are identical (image 17).  This is the moment you’ve been waiting for. Take a few steps back and take a look at your bike. There it is … finished and ready to be photographed (image 18).  Now it’s up to you. Good luck ! Special thanks to Eric Garwood who provided all the information and pictures ! |
||||||||||||||||||
 |
|||||||||||||||||||
 |
|||||||||||||||||||
 |
|||||||||||||||||||
|
|||||||||||||||||||